LAWN & GARDEN TESTING

HOW TO TAKE A SOIL SAMPLE
1. Select the Proper Equipment:
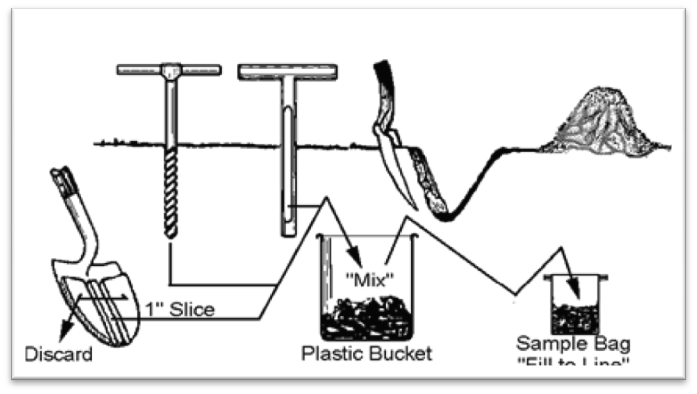
A soil sample can be collected using several different tools. Ideally, a soil sample should be collected with a chrome plated or stainless steel sampling tube or auger. However, if these are not available a clean spade or shovel will work just fine. Avoid galvanized, bronze or brass tools as they could contaminate samples. Always use a clean, plastic bucket to collect your sample. Never used galvanized or rubber buckets as they could contaminate samples. Take several subsamples (approximately 12 to 15) to represent 1 soil sample. See figure 1.
Figure 1:
Instructions for collecting a sample. Take sampling tube, auger, or shovel to collect 1 inch slice sub samples, mix them in a plastic bucket to get a sample for the sample bag,
2. When to Take Samples:
Sampling can be done at any time of the year. The key is to be consistent. If you take your first sample in the spring and then resample again in a few years in the fall this could lead to large variations. Always take your soil sample in the same month as you did in the past. Wait a minimum of thirty days to sample after application of fertilizer, lime, or sulfur.
3. How to Sample an Area:
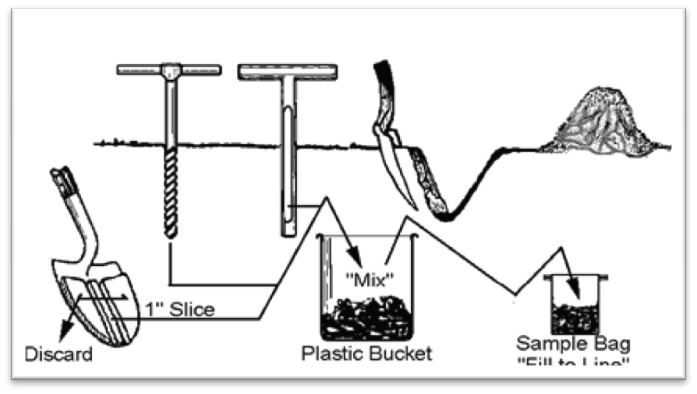
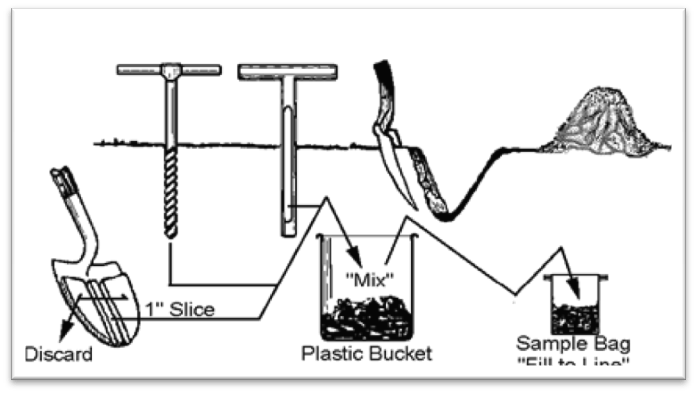
Samples must be representative of the area you are going to treat. Often times sampling by soil color is an acceptable method for dividing large areas into soil sampling areas. Areas that differ in slope, drainage, past treatment, etc…should be sampled separately. In the case of a garden, if the area is small enough with very little change in slope or soil color then it is feasible to just take a single sample for analysis (remember though that one sample is 12 to 15 probes or shovels of soil thoroughly mixed together). For a yard, Figure 2 is a good representation of what one might do. In this case 4 soil samples are taken. One to represent the garden, one for the front yard, one for the back and one for the tree/shrub area. To take a soil sample for a tree collect several soil cores from the drip line (see Figure 3). Mix in a bucket and then pour bucket into soil sample bag or plastic sandwich bag.
Figure 2:
Instructions for collecting a sample. Take sampling tube, auger, or shovel to collect 1 inch slice sub samples, mix them in a plastic bucket to get a sample for the sample bag,
Figure 3:
Instructions for collecting a sample. Take sampling tube, auger, or shovel to collect 1 inch slice sub samples, mix them in a plastic bucket to get a sample for the sample bag,
4. Sample Depth:
Sampling depth must remain consistent because many soils are stratified and a variation in depth could introduce errors in the soil test results. Recommended sampling depth for Lawns/Turf is 4 inches, for a garden it is 7 inches, for pasture it is 4 inches, and for orchards or other trees it is 7 inches. Again, the key is that the sampling depth must remain consistent no matter what depth is chosen.
5. Number of Cores and Size of Area per Sample:
Various studies have shown that 12 to 15 cores per sample are needed to reduce soil test variability. A smaller number of cores per sample can introduce variability into results from different sampling years. There is no rule for the size of the area that one sample can represent. This really depends on the local situation. Are there differences in slope? Does the soil color change? If the area is quite small, such as a small back yard garden. Then one sample will likely do. If the area is being sampled is a several acre yard, then it is quite possible that several samples will need to be pulled.
6. Sending in the Sample:
Thoroughly mix the randomly taken core samples in a plastic bucket and remove a separate, well-mixed composite sample (about 1 cup of soil) from the mixture. Place it into a Brookside Labs paper sample bag or a new plastic sandwich bag can be substituted. Make sure to write the sample identification on the bag and seal bag so soil does not leak (for paper bags just fold the top down).
7. Completing Sample Submittal Form:

On the Sample Submittal Form record the name of the sample and any other sub-sample ID’s. Make sure to fill out your name, address, and email (if you have one). Complete any other information as desired.

NOTE:  You will need to contact the lab for a Sample Submittal form by sending a request to info@blinc.com

8. Mailing or Dropping Off the Sample:

Samples can be shipped via US Mail, UPS, FedEx, etc.  When shipping, please ensure samples are properly sealed and placed into a strong box. If only sending a sample or two a strong envelope may even be used.  Send samples to: 200 White Mountain Drive, New Bremen, OH 45869


For more information about sending in soils, please email info@blinc.com

UNDERSTANDING A SOIL ANALYSIS REPORT
Important Information
This fact sheet contains information describing the results for each section of a Brookside soil analysis report. Brookside Laboratories, Inc. does not give recommendations, however, we do provide an excel based recommendation program where you can input your soil analysis results and then a graph is generated that shows the rating for each of the results related to optimum plant growth. Optimum nutrient levels are also given below the graph so you can see how much in excess or deficient you are in a particular nutrient. However, always remember that all plants have different nutrient requirements and these ratings are just an average. Some plant species have different minor nutrient, pH, base cation, phosphorus, and sulfur requirements.
  • Report Terms

    Parts per million (ppm):

    Results for the major and minor elements are reported in parts per million (ppm) on an elemental basis. An acre of mineral soil 6 to 7 inches deep weights approximately 2,000,000 pounds. Therefore, to convert parts per million readings to pounds per acre, multiply by 2.


    ME/100 g (milliequivalents per 100 grams):

    Total exchange capacity is expressed in milliequivalents per 100 grams of soil. To determine this soil cations, such as calcium, magnesium, hydrogen, potassium, and sodium are expressed in terms of their relative ability to displace other cations. The unit, ME/100 g serves this purpose.


    Millimhos/cm (mmhos/cm):

    Electrical conductivity measurements are often used to measure the amount of soluble salts in the soil. Conductivity is generally expressed in mmhos/cm. The conductivity increases with increasing soluble salts, and most plants typically begin to struggle when the conductivity reading of the saturation extract reaches 2.0 mmhos/cm.

  • Soil Analysis

    Total Exchange Capacity (TEC):

    Measures the capacity of the soil to hold nutrients. The higher the TEC reading, the greater the capacity. Peat or muck soils will have TEC’s in excess of 35, heavy clay type soils have TEC’s ranging from 15 to 35, loamy soils from 6 to 15, and sandy soils are often below 6. Although high TEC soils can hold more nutrients, it does not necessarily imply that they are more productive. Much depends on good soil management (such as drainage, tillage, nutrient ratios, etc…).


    Soil pH:

    Total exchange capacity is expressed in milliequivalents per 100 grams of soil. To determine this soil cations, such as calcium, magnesium, hydrogen, potassium, and sodium are expressed in terms of their relative ability to displace other cations. The unit, ME/100 g serves this purpose.


    Buffer pH:

    This measurement is an index value used for determining the amount of lime to apply on acid soils with a pH of less than 7.0. A value of “NA” is given on soils with water pH’s greater than 7.0.


    Organic Matter:

    Measures the amount of plant and animal residues in the soil after initial decomposition. The color of the soil is often closely related to the organic matter content. Light colored soils generally have 1 to 3.5% organic matter, while dark colored soils often range from 3.5 to 7.0% or higher. The organic matter serves as a reserve for many essential nutrients, especially nitrogen. During the growing season, a part of this reserve nitrogen is made available to the plant through soil microbial activity.


    Estimated Nitrogen Release:

    This is a calculation estimating the amount of potential nitrogen to be released in a growing season to the plants. The calculation is based off of the organic matter content of the soil.


    Soluble Sulfur:

    The soil test measures several forms of sulfur that can be readily available. Higher sulfur levels can occur when soils have reduced internal drainage, high soil pH, or are irrigated with water that his naturally high in sulfur. Optimum levels of sulfur in soil often depend on soil organic matter level content, soil texture, drainage, and yield goal. Generally, whenever the following conditions exist, the need for sulfur will be increasingly important for optimum plant growth:

    • Well drained, low TEC soils
    • Soils low in organic matter
    • Low soil pH (below 6.0)
    • Use of high analysis, low sulfur fertilizers
    • High application rates of nitrogen fertilizers
    • High sulfur demand crops

    Overall the effectiveness of sulfur fertilizers is related to how fast the product becomes water soluble in the soil so that it is available for plant uptake.


    Phosphorus:

    We offer several different phosphorus tests. The most common is the Mehlich 3, which is included on all our standard packages. It gives an estimate on the amount of plant available P in the soil. Ideal levels are around 30 to 35 ppm, but may be higher for specialty crops, fruits, and vegetables. The Bray II phosphorus test is included on some reports too. The Bray II also measures plant available phosphorus, but it is a little stronger extraction and estimates some of the active reserve phosphorus in the soil (the portion that would become plant available once the plant available pool is used up by actively growing plants). A level of 40 to 60 ppm is good for most crops. Other P tests are available, but most are related to specific soil conditions/situations. These values in ppm can be multiplied by 4.58 to change units into pounds per acre of P2O5, which may make fertilizer recommendations easier.


    Exchangeable Cations (Calcium, Magnesium, Potassium, and Sodium):

    The amount of cations found on soil exchange sites (TEC). Levels of each nutrient vary between crops, soil types, soil textures, etc…


    Base Saturation Percent:

    Percent saturation refers to the proportion of the TEC occupied by a given cation (an ion with a positive charge such as potassium, sodium, calcium, magnesium, and hydrogen). The percentage saturation for each of the following cations for optimum crop performance will usually be within the following ranges:

    • Potassium: 2 to 5%
    • Magnesium: 12 to 18%
    • Calcium: 65 to 75%
    • Hydrogen: 0 to 12%
    • Sodium: Less than 1% and/or less than the % potassium
  • Understanding a Soil Analysis Report

    Extractable Minors:

    This category includes boron, iron, manganese, copper, zinc, and aluminum. Aluminum in this situation is only used if one would want to calculate a phosphorus index. The other extractable minors are needed by plants for proper physiological growth. Recommendations for these nutrient elements can be tricky because they can often vary quite a bit between different plant species. However, most mineral soils are adequately supplied with them, especially if large amounts of organic materials have been worked into the soil. Below are ideal levels for most plants:

    • Boron: 0.8 ppm
    • Iron: 100+ ppm
    • Manganese: 35 to 75ppm
    • Copper: 2 ppm
    • Zinc: 5 ppm

    If minor nutrient elements are needed, purchase a soluble micronutrient fertilizer material at a lawn and garden store and follow the manufacturer’s directions for applications. Be careful with application of minor elements because over-applying these can lead to serious growth issues due to toxicity.

  • Selecting Fertilizer Materials

    Nutrient Recommendations:

    The key here is to make sure that you are selecting the proper fertilizer materials. If you are dealing with a small area; an acre or less, you will be dealing with very small amounts of fertilizer and it is often more convenient to apply all nutrients as a single mixed fertilizer. On larger areas, it may be more economical to use a combination of fertilizer materials. In order to determine which blend fits your needs you will need to have an understanding of a fertilizer label.


    A fertilizer label will contain 3 numbers which indicate the nutrient content of the material. The first number indicates the % nitrogen, the second is % phosphate (or P2O5) and the third is % potash (or K2O). For example, 100 pounds of 12-12-12 fertilizer would contain 12 pounds of nitrogen, 12 pounds of phosphate and 12 pounds of potash or a 20 pound bag would contain 2.4 pounds of each nutrient.


    Example:

    The following example describes how to calculate the amount of fertilizer needed from the soil analysis report. A recommendation is for 100 pounds of N, 20 pounds of P2O5, and 60 pounds of K2O. Thus the ratio of nutrients needed is 5:1:3. You can use any number of materials, but something like 25:5:15 which has the same ratio is easy to work with. To determine the amount of the 25:5:15 blend needed to meet your recommendation follow the steps below.

    1. Divide your recommendation by 44 to get from pounds per acre to pounds per 1000 square feet. 100/44 = 2.3; 20/44 = 0.5; 60/44 = 1.4; now you have 2.3-0.5-1.4
    2. Multiply the above answer by 100 to get 230-50-140
    3. Now divide the answer in step 2 by the N or P2O5 or K2O content of the fertilizer to get 9. Therefore, it requires 9 pounds of 25-5-15 per 1000 square feet to deliver 2.3 pounds of N, 0.5 pounds of P2O5 and 1.4 pounds of K2O, which matches your recommendation.

    Note: Organic amendments can be used and they will deliver micronutrients too. If buying organic amendments from a garden store there will likely be an analysis on the bag (5-3-2 or something of that nature) that can be used to determine the amount of material needed to satisfy your recommendation. If you are not buying the organic waste and are using manure, it may be wise to have the manure tested so you can put down the right amount of material. Years of over application of manure can lead to nutrient imbalances in the soil, which could cause productivity issues.

Share by: